Mechanical Training With ATP Increased Throwing Velocity +7 MPH In Two Weeks
There are so many ways to address someone’s needs in a throwing program. Here is a case study of a remote programming client seeing good results with his training, but needing some tinkering with his throwing mechanics.
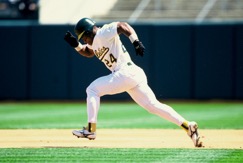
Kaito, highlighted here, is using 9oz balls to repattern his arm action and load. As you can see in the video, his hand goes from below his elbow at ffc to above and there are significant changes in his hip: shoulder separation.
As we progress, there are other mechanical changes we will address, but for the time being, we will continue to push Kaito’s new mechanical changes as well as lock in his velocity gains. His previous mound velo was 84mph, but with his recent changes in mechanics and fixing issues with his force-velocity curve, we know he mid-90s in the tank.
To schedule a mechanical consultation with Dr. Heenan via email: jheenan@advancedtherapyperformance.com
Mechanical Improvements Lead To +8 MPH In 4 Months For Zach
I’ve been fortunate enough to work with Zach since he was a sophomore in high school. The summer prior to his Freshman year at the University of Massachusetts, he was consistently mid to upper 80s.
⠀
As he entered his first college season, his velo tanked (87mph to 78mph). There are many moving parts so it’s difficult to pinpoint exacts, but strength and mechanics were absolutely off by the time he came home from his first college season. Any pitcher that has lost almost 10mph in a year can attest to how Zach felt.
⠀
Zach worked hard this summer to get his 90mph formula metrics where they needed to be and we used the throwing video on the left as his baseline of how we needed to address his throwing mechanics through a few specific drills.
⠀
As he entered school this fall his 90mph formula metrics were:
-Trap bar- 425lbs (+8 chains)x 2
-Lunge- 315lbs for 3
-Chin up- 270lbs
-Bodyweight- 205 lbs
-Long toss- 300 ft
-Optimal Authentic Mechanics
⠀
Zach’s Optimal Authentic Mechanics are still a work in progress, but with the added strength (+100lbs on all big lifts), size, and more efficient mechanics he’s back to 86mph with regularity.
⠀
Something many people forget when overhauling mechanics is how accuracy sometimes falls apart during the initial phases. It’s often a necessary evil of restoring more efficient mechanics. Once those mechanics become authentically engrained with more quality reps, accuracy will be restored if strength metrics are held constant or improved.
⠀
Be sure to watch how much more athletic his newer mechanics are now vs the summer. Pitching should be a highly athletic movement.
⠀
I expect that as he continues to address his mechanics (especially his front leg lock) he will continue to add velocity until he regularly hits +90mph.
To learn more about our on-site training, visit our website by clicking here.
Progressing the Reverse Lunge for Improved Performance
Guest post written by Brian Donofrio, C.S.C.S.
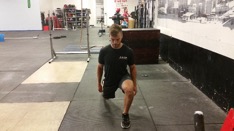
When working with athletes (especially our baseball guys), I’ve found the reverse lunge to be one of the best bang for your buck exercises we do in the weight room. It’s great for teaching proper loading of the hips, core control through the sagittal, frontal and transverse planes, as well as building stability, strength and power in a lunge pattern. And the carry over to sport is huge. Whether the athlete is running, throwing, or swinging, developing both stability and strength in the reverse lunge will lead to huge success. And through proper progressions and coaching of the reverse lunge, we can set our guys up to be stronger, faster and more powerful athletes.
Once an athlete successfully learns how to complete a reverse lunge, the benefits are huge. Getting to that point, though, requires allocating the time needed to build a strong foundation for the athlete to be successful in the movement. I’ll go over how exactly we attack the reverse lunge and how we get our guys into great positions that lead to success on the field.
When teaching a reverse lunge, or any exercise for that matter, you need to perfect the athlete’s baseline for the movement before you can progress them and start loading it. For some advanced lifters, you might be able to show them a proper reverse lunge a few times and they immediately crush it. But more often than not we need to start from the ground up, and work our way to performing the reverse lunge.
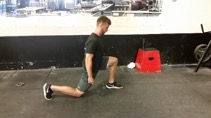
½ Kneeling Position
For most of our guys, this baseline means just getting them into a perfect ½ kneeling position on the ground. We teach them to have a good amount of dorsiflexion and a positive shin angle in the front leg. In the trail leg we look for full hip extension, and the back ankle dorsiflexed with the toes driving into the ground. We get them set up with the ribs down with the chest tall, neck back and chin tucked. The basic cues we use are to engage the core, feel the hips, and drive the toe into the ground. Here they can understand where we want them to feel tension through lower level activation. It also gives us the benefit of using kinesthetic cues to get the athletes exactly where we want them to be and give them more points of contact to reference and stabilize from. We might also incorporate some thoracic rotational work or overhead reaching in this position to train more dynamic stabilization in the position before moving forward. This allows the athlete to get a basic understanding of positioning and gain a kinesthetic sense for the position we’re asking them to get into.
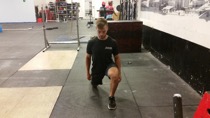
Split Squat Hold
The next progression is to have the athlete perform a split squat hold (the bottom position of the reverse lunge). We’re looking for similar position as in the ½ kneeling position, except now the back knee is just off the ground, removing a point of contact to the ground. This makes it a more demanding position to be in and further challenges the athlete to build stability in the unilateral pattern. We’ll also incorporate proper breathing techniques to get them more comfortable in this position and improve their ability to hold it for a longer period of time. We typically like to work an athlete up to the point where they can hold that position for about 2 minutes/side. Just like with the ½ kneeling position, adding in rotational work or overhead reaching increases the transference to the field in terms of dynamic stabilization requirements.
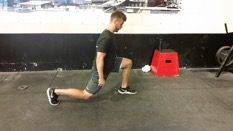
Split Squat
Once the athlete is successful with the split squat hold, we can move on to a full split squat. Start with the athlete standing upright, with front and trail leg about 1 stride length apart with feet at hip width. The athlete then descends into the bottom position (the split squat hold described above). We have the athlete briefly pause here before driving back up. The key for carry over to the reverse lunge is to focus on the eccentric and isometric portion of the movement. This helps engrain the pattern and improves the athlete’s kinesthetic sense throughout. To further load this movement we may use a KB in a goblet or unilateral/bilateral front grip hold, a barbell in the front or back position or a safety bar to increase the demand of the tissues and further challenge the stability demands.
Reverse Lunge
As the athlete successfully completes the split squat, with the end positions and movement pattern performed to our standards, we can then start utilizing the reverse lunge in training. The athlete stands tall, with feet even about hip width apart. We’ll start by having the athlete take a step back and sink into the bottom position, holding there for a set amount of time.
The big cue here is to load the hips through the decent, building up tension and force to transfer through the ground on the concentric portion of the lift. We progress with a slight pause at the bottom followed by a powerful drive to the starting position. I coach my athletes to drive at an angle, using the hips to move forward to the starting position as if they are throwing a baseball to home plate or sprinting away from the line of scrimmage towards the end zone. We look to see that the athlete can maintain an upright position in the torso, and is able to stay balanced through the motion without leaning to one side or the other. Make sure the athlete is stabilizing through the core the for the entire lift, which is apparent if they can keep their weight shifted forward rather than swaying back in the bottom position or as they begin the concentric portion of the lift.
As the athlete becomes successful with the movement, we can load it in a number of ways, from a goblet hold with a kettlebell to a safety bar to a barbell. As long as they maintain good positioning and movement pattern, we can really challenge our athletes here.
Summary
If you want your athletes to keep progressing in the weight room, then you have to ensure they master the basics before attempting more complex movements. Give them the framework of proper position and movement patterns in more foundational exercises, and you can see a huge carry over. By establishing a strong foundation through positioning and proper progression, we set our athletes up for success not only in the weight room but on the field. Take time perfecting the basics, and the benefits will be huge for your athletes.
About the Author
 Brian is a strength coach based out of Advanced Therapy and Performance in Stamford, CT. He trains athletes from the high school to professional level, drawing upon his experiences in athletic performance and rehabilitation. He has worked extensively with collegiate athletics at his alma mater, the University of Connecticut, where he earned his B.S. in Exercise Science. After graduation, he worked with UConn Football Strength and Conditioning, as well as with a number of the school’s D1 athletic programs, including Men’s Soccer and Men’s Track and Field, as an undergrad. Brian holds his CSCS through the NSCA. You can find Brian on Instagram or at advancedtherapyperformance.com
Move Fast, Throw Hard, Live Well – If You Are In Pain Get Treated ASAP- Direct Access
Today’s post is going to be quick as I am off to talk to the Fairfield American Little League Program’s coaches about injury reduction and red flags with their athletes.
One of the main points I try to make at these talks is to refer out ASAP if there is pain. Orthopedic doctors are great, but in most cases it’s more advantageous to see a qualified Physical Therapist or Chiropractor first.

Back Pain
Much of the research references acute lower back pain. Within the studies they show the typical cycle of back pain, waiting a few days, calling the orthopedists, waiting a few days to get an appointment, going to the appointment, getting an MRI and/or x-ray, then being referred to PT. In most states, Direct Access is available to walk directly into a Physical Therapy office and get treated. Some argue there is a fear factor, as PTs don’t do X-rays or MRIs, which I completely understand. In rebuttal to those claims, a good PT or Chiro will evaluate pain and immediately refer out if they believe you need a second opinion or diagnostic imaging.
“A 4 year study of Blue Cross Blue Shield of Maryland claims data and found that total paid claims for physician referral episodes to physical therapists were 2.2 times higher than the paid claims for direct access episodes. In addition, physician referral episodes were 65% longer in duration than direct access episodes and generated 67% more physical therapy claims and 60% more office visits. The HSR study looked at a far more extensive number of episodes than the previous study, and also controlled for illness severity and other factors that could have affected the patients’ outcomes.”1,2
60% more visits and cost is a large time frame and price to pay just for going to the Orthopedists!
The take home point of this info is not that going to the doctor is a bad thing, but waiting around for your pain- regardless if its back, elbow, neck, knee, hip, whatever- to subside magically instead of getting treatment will cost you in the long run; both in time and money. Have a trusted team of professionals to turn to immediately when you are in pain, and if you need the opinion of your doctor those professionals will gladly send you their way, but wasting time to get into the doctor or for the pain to go away is just that, a waste.

Trusted Side Kick #1

Trusted Side Kick #2
Good luck to everyone in their seasons!
Works Cited
1. Pendergast J, Kliethermes SA, Freburger JK, Duffy PA. A Comparison of Health Care Use for Physician-Referred and Self-Referred Episodes of Outpatient Physical Therapy. Health Serv Res. 2012;47(2):633–654. doi:10.1111/j.1475-6773.2011.01324.x.
2. Mitchell JM, de Lissovoy G. A Comparison of Resource Use and Cost in Direct Access Versus Physician Referral Episodes of Physical Therapy. Phys Ther. 1997;77(1):10–18.
Move Fast, Throw Hard, Live Well- Little League Curveballs and Youth Weight Training
This weeks post I am going to share a readers question and my response about weight training his younger athlete. If you have a question you would like answered feel free to shoot me an email.
Enjoy!
Q:
What would you recommend for a 13 yr old 7th grader, honestly? I am not wanting him to do more than hi-rep, bodyweight exercises at most. He’s 5’9” (and growing), 110 lbs. throws pretty hard – has a nice arm, and I want to keep that intact. Staring the travel ball with a good, established organization in IL this year…what are your thoughts on throwing curve balls, if taught by a former pro pitcher, etc? (I am leery of that).
A:
As I said in the webinar, if you can play organized sports, you can train (and its safer!). High rep stuff is fine, but that’s where we usually see injuries because of fatigue and poor form. Moderate weights would be a better option for him. Move well and then move higher weights.
Here is my take on youth curveballs; research wise if it’s being taught properly (mechanically efficient) there is not a huge chance of injury. That being said, there are a ton of bad coaches out there (not that his is bad–I have no idea), but being a former pro doesn’t automatically qualify you to be a “good” or well researched coach.
From what I have seen in the rehab and coaching world, poor progression of throwing (jumping up in intensity or mainly volume) too quickly leads to lots of issues. The kids who throw “too many curveballs” are usually the kids who cant compete with just a fastball. And as I have written about before, skipping on fall/winter baseball is a must.
At this point in my career, if my child was a pitcher in little league I would encourage fastball and change up location and speed, that alone will keep batters off balance. Once they start shooting through puberty (13-15 years), I would let them play with curveballs with a coach that is highly qualified. I grew up with a coach who said “never two curves in a row” for both practice and play. Great rules to help set-up hitters and stave away from overuse.
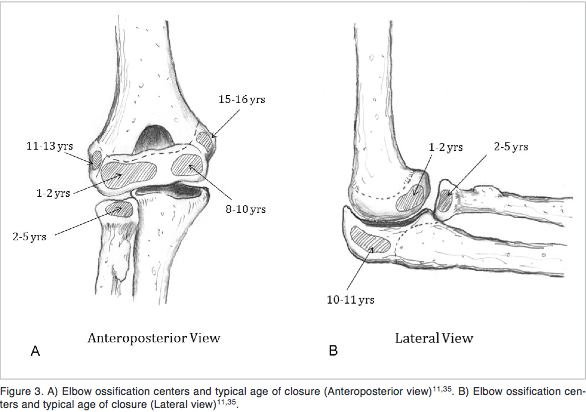
The image attached is a visual of when portions of the arm ossify. The medial epicondyle is the last to fully fuse and we should always proceed with caution.
On the other hand, Phil Rosengren does a great job at expressing why he thinks kids should be tough the curveball at a younger age. To be frank, I don’t disagree with any of his points. And to Phil’s credit, every athlete he has sent me has never had an elbow pathology.
Many people are racing for their kids to be on ESPN in the LLWS. I think they are racing the wrong race. I’ve had the opportunity to work with many kids whom have been on ESPN before the age of 13… some of what they are dealing with mentally are so unfathomable it’s disgusting. Not to mention some of the injuries I’ve seen especially from the “best” players on those teams.
Move Fast, Throw Hard, Live Well — Thoracolumbar Fascia, Pitching and Youth Athletics
2013 proved to be the busiest of years in all aspects of my life. A short list of events include: buying a house, getting engaged, moving my fiancé to another country, starting my Doctorate of Integrated and Natural Medicine, and seeing over 100% growth from 2012 in our performance and fitness division. On top of all of those things, I still manage to spend 10-20 hours reading research, blogs, and conduct case studies, because I truly love it and want to provide my clients and readers with the best information available.
The reason I write all of this is I plan to write, at minimum, once a week on any research, articles, cases or thoughts. As always, any suggestions or comments please provide below.
Without further adieu…
-
Thoracolumbar Range of Motion in Baseball Pitchers and Position Players
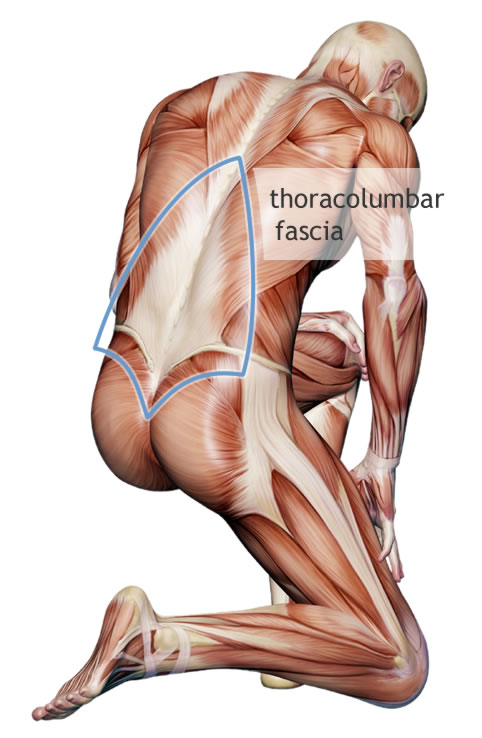
“Pitchers have a greater amount of rotation ROM towards the non-throwing arm side as compared to position players. Pitchers also have a greater amount of rotation ROM to the non-throwing arm side as compared to their throwing side rotation. Because pitchers often present with posterior shoulder tightness and subsequent altered shoulder horizontal adduction and internal rotation ROM, the increase in non-throwing side rotation ROM may occur in response to these adaptations. More specifically, this increase in non-throwing side trunk rotation ROM may allow such athletes to bring the arm across the body during the follow-through phase of the throwing motion despite posterior shoulder tightness.”Thoracolumbar fascia is a large, fibrous tissue located in our lower back that connects into our lats and glutes; a powerhouse for generating force in rotational athletes. In pitchers, I have often said that improved extension and external rotation of the arm will lead to more powerful pronation and velocity increases. This research gives added validity to rotational training in both directions to allow the non-throwing side trunk to create a larger lever to generate more trunk force and increase MPH.http://www.ncbi.nlm.nih.gov/pmc/articles/PMC3867070/ -
Overuse injuries and burnout in youth sports: A position statement from the American Medical Society for Sports Medicine
This is a must read for any coach or parent. A portion of the younger athletes I evaluate play one sport all year round, deal with nagging and long term injuries, and have many of the symptoms of burn-out. Worse part is when I pull the parent aside and explain how I think playing multiple sports “for fun” will be incredibly beneficial they often ignore the advice until the child has a serious injury.http://www.amssm.org/Content/pdf%20files/2014_OverUse_Injuries-Burnout.pdf”
-
Differences in physical fitness and motor competence in boys aged 6-12 specializing in one versus sampling more than one sport
The researchers found “multiple comparisons revealed that boys aged 10-12 years, who spent many hours in various sports, performed better on standing broad jump and gross motor coordination than boys specializing in a single sport.”http://www.ncbi.nlm.nih.gov/pubmed/?term=Differences+in+physical+fitness+and+motor+competence+in+boys+aged+6-12+specializing+in+one+versus+sampling+more+than+one+sport.
So… you’re saying that playing multiple sports will give my athlete a chance to be more powerful, more athletic, and help avoid long term physical and psychological dysfunction?
YEP!
5 Tips to Improve Your 60-Yard Dash

As discussed in the 60-Yard Dash: A Case Study post, the 60 is not the most applicable test of “speed” for baseball players, but it is one that will likely be around for a long time. The sprint has many qualities to be optimal; including power, strength, stability, flexibility, and plain old good movement. Without assessing someone for strengths and limitations here are 5 tips to improve your 60-yard dash.
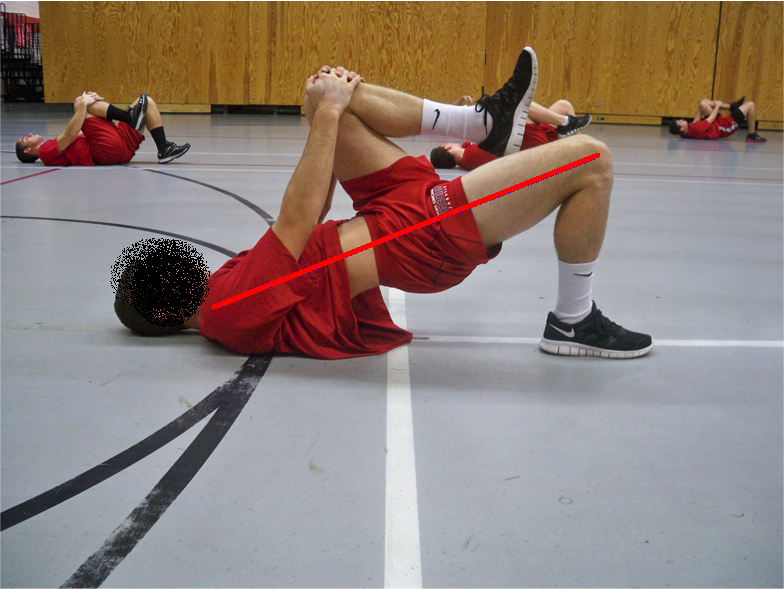
1) Hip Flexor Mobility
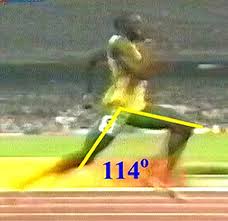 Hip flexors will often be tight and limit the amount of hip extension your leg can get. Increasing hip extension will allow you to naturally increase your stride length. If you can increase stride length without over-striding, you will cover more ground and have need less strides to complete the sprint.

Quad/Posas-Hip Flexor Stretch- hold for 60 sec, while flexing the down leg glute as hard as possible.
2) Hamstring Mobility
Having good hamstring mobility will allow you to naturally extend your leg further in front of you than with poor hamstring mobility. This will again add to your stride length cutting down on the amount of strides needed.
Spider lunge with hamstring floss 10x
3) General Lower Body Strength
Squat, lunge, deadlift, sled push, and farmer’s walks all teach how to put force into the ground and will bring up base strength. Aim for a squat and deadlift of 1.5-2x bodyweight is a great place to start.
4) Specific Lower Body Strength
Single leg hip thrusters are almost the exact same mechanics as running. Squatting and deadlifting are great tools to teach general force production, but single leg hip thrusters are a better tool to apply force in the posterior direction with nearly identical mechanics as a sprint.
3-10 sets of 5-15 reps
5) Specific Lower Body Power
Repeated power with force in the posterior direction is going to carry over to sprint performance seamlessly. Acceleration, the most difficult phase to decrease in short sprints, is directly effected by the amount and quickness of the force that can be placed into the ground—exactly what the single leg trip jump reveals. Use this as your primary measuring stick in training to see if you have become more powerful.
Conclusion
There is no substitute for practicing (and video taping!) 10 and 60-yard dashes to improve your performance, but these tips will leave you more flexible, stronger, and most importantly, FASTER.
The 60-Yard Dash: A Case Study

The 60-yard dash is often one of the first quantitative tests scouts at both the college and professional levels wish to see performed well.
This test has been deeply engrained into the dogma of baseball, while science and many coaches believe that there are better options. The 60-yard dash tests acceleration, top speed, and maintenance of top speed over 180 total feet. In general, baseball is a sport of acceleration and deceleration, not top speed. Regardless of it’s applicability many coaches and scouts use it as a gauge of athleticism and should at least be a consideration for athletes wanting to been seen as competitive. Here’s a case study to show how we address improving speed.
As an incoming freshman shortstop at Sacred Heart University, John Murphy had a 7-7.1 60-yard dash. With a front squat max of 245 and a vertical jump of 25 inches his power and strength was considered average to below average for SHU’s program.
My favorite test for both power and asymmetries is the single leg triple jump (SLTJ). The test is performed by standing on one leg and making 3 consecutive broad jumps on the same side while remaining in control. The goal is to jump as far away from the starting point while sticking each landing. When there is a side-to-side discrepancy of over a foot I investigate deeper to see if we are dealing with strength deficit or something more structurally.
Scoring an average of 21 feet on each side puts John right in the middle of a team average of 22, nothing special to say the least. The ability to apply force into the ground and accelerate your body forward gives us a nice picture of single leg power and a large carryover to running.
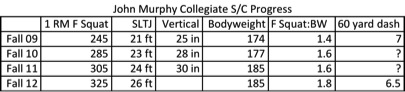
As you can see in the chart, as the years progressed, John’s squat, single leg triple jump, vertical jump, and front squat to bodyweight ratio make improvements every year. Increasing relative strength compared to bodyweight and teaching how to increase force production once movement dysfunctions are addressed will consistently increase speed— more importantly acceleration.
An interesting fact to note when looking at the data is that John’s junior year is when he really took his diet to the next level. When dealing with athletes of all levels it clicks at different times. Sometimes this has to do with whom they spend the majority of their time with and sometimes it just takes time to see the light at the end of the tunnel with a goal. Either way, John honed in on his diet by adding about 10 lbs of muscle and dropping a few of fat, again increasing his potential to produce force and become faster.
By John’s senior campaign he had been clocked as low as 6.5 in his 60 and was easily the most powerful athlete in his program. Looking back at his freshman year 21 foot triple jump (7 feet per jump) and increasing it to 26 feet (~8 ½ feet per jump) is a very large difference. This effectively lengthens his stride without changing his mechanics and drops 3-5 strides or ground contacts during his 60-yard dash, dramatically decreasing his time to plus speed in the eyes of MLB organizations.
When training athletes, strength coaches often forget the goal of athletic performance. Our job in the weight room is to help minimize or prevent injury, increase movement efficiency, increase overall strength, and increase force production in a way that it relates to our athlete’s events. You can see we did not test vertical jumps in 2012 because after the past 6 years I have come to realize that the carry over to baseball or other athletic development is much larger with the triple jump gave me lots of qualitative and quantitative data to use in our programming compared to vertical jump data.
Tips to Increase Acceleration Speed
-Video tape and practice your 10-yard dash. Use the video to get your current time and work to improve it. Once your 10-yard dash goes down, your 60 will drop dramatically.
-Increase your front squat max to 1.7-2x bodyweight with solid depth.
-Minimize fat mass and optimize muscle mass. Murph has had his bodyfat as low as 4.5%. By carrying minimal fat mass all weight is functionally producing force.
Solving Volleyball Knee Pain
Competitive volleyball is a sport plagued with countless injuries. One of the most common injuries reported is jumper’s knee.
Jumper’s knee, patellar tendonitis or patellar femoral syndrome (PFS) are the common diagnosis for “general” front of the knee, pain. Knee pain in a jumping sport can be incredibly debilitating as in many cases it can take as long as months to fully recover.
When looking at patellar tendonitis for our athletes; the first area of concern is the ankle. Acute ankle injuries make up a majority of volleyball injuries(Bahr & Bahr, 1997). Injured ankles often lack the proper mobility, mainly in dorsiflexion (e.g. limited motion foot towards the shin). As you can see in the images below, poor ankle mobility can lead to poor landing mechanics and put more stress to the knee and can irritate any existing knee pathologies or create new ones.

ACL Drop Test- also a good test for patients with knee pain.
After clearing the ankle, we usually attack hip mobility and glute strength. Any tightness in the hip flexors are going to limit the strength of our glutes, which often leads to poor movement at the knees and limited jumping power, both major qualities needed for successful volleyball play. A basic strengthening and test exercise for glute strength is a single leg bridge. We look for knees, hips and shoulders to be in one straight line.
Good Glute Bridge
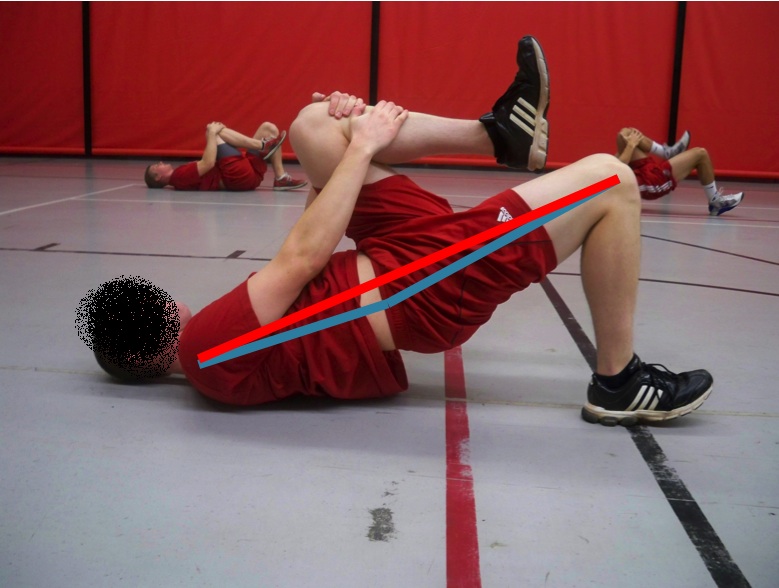
Poor Glute Bridge
Addressing soft tissue of the quads and glutes through foam rolling and manual therapy expedite the recovery time. Often with aggressive treatment we can see jumping athletes back on the court the same week.
Assessing overall movement followed by breaking down each joints function helps us paint a picture of why the knee is the culprit in pain; as it is usually not the dysfunctional area driving the pain.
Related Articles:
Ankle Instability: Rest vs. Early Mobilization by Craig Leibenson
Hamstring Dominance by Brijesh Patel
References
Bahr, R., & Bahr, I. A. (1997). Incidence of acute volleyball injuries: a prospective cohort study of injury mechanisms and risk factors. Scandinavian Journal of Medicine & Science in Sports, 7(3), 166–171. doi:10.1111/j.1600-0838.1997.tb00134.x
Long-Term Athletic Development vs. “Classes”
It feels like a daily occurrence that I receive phone calls from athletes and parents inquiring about the training I direct. Often, the player or parent wants a class to participate in, usually an off-season or pre-season workout that is geared towards their sport.
As I stated in my presentation in Fairfield a few months ago, our goal of long-term athletic development is ”to allow each individual athlete to reach their genetic potential in a healthy manner, both mentally and physically. This means minimizing injury and allowing fitness/sport to be a fun part of an athletes life regardless of the level of participation.”
Classes can be a way to introduce general skills to athletes. Most sports require many of the same movements as other sports, so a general approach to training can produce results, there is no denying that. The problem with classes are in-fact many.
- Athletes are often not screened or assessed for movement or orthopedic limitations.
If there is no assessment, how do you know what needs to be corrected? - Assessments are not looked at when altering a class.
What’s the point of assessment if your not going to use the information it provided? - Injury histories are not taken.
Previous injury is the #1 predictor for future injury. If you do not know how and why someone had a previous injury, how are you going to minimize the risk of it happening again? - Specificity of sport is not accounted for.
There is more than one way to skin a cat or train an athlete, but forcing every athlete to do the same thing without making modifications for the sport an athlete participates in or the position they play is often going to set them up for injury or less than optimal performance outcomes. - There is no change in programming for age or skill level.
I’ve seen classes where professional football players and 13 year old softball players are handed the same program (in front of each other). I can’t make this stuff up. The demands a growing adolescent girl and a professional football player are drastically different and should be accounted for. - The trainers/ coaches are awful and don’t know how to coach, let alone coach numerous athletes at the same time.
To be fair this can happen anywhere. I have walked into a division I college weight room and saw a female basketball team doing cleans; every single girl had a valgus collapse of their knees (some were actually smashing each other). And the coaches then wonders why they lose 4 of their 11 athletes to ACL tears that year.

Long-term athletic development is always the goal when an athlete comes and trains with me in either our 1 on 1 training, semi-private training, or our Sacred Heart Baseball Team. We start with the end in mind, not just 6 weeks from now, but years from now.
When training any clients, assessment always takes place on day one. If we find any drastic limitations or red flags, we elicit our physical therapists on staff to help diagnose the problem. In more sever cases, we refer out to a physician whom can help better address the problem. Our in-depth orthopedic and movement assessment along with injury history, personal/sport goals we are able to develop a program that allows us to attack limitations and strengthen weaknesses immediately. This allows us to set short-term and long-term goals for on and off the field.
Long-term athletic development is always an ongoing process, and needs constant attention. This means training in-season (even if frequency and volume is down) and training around injuries. To continually develop, athletes must push out of their comfort zone and work their weaknesses on an ongoing basis to maintain the skills and adaptations their body has attained from training and sport.
When looking to reach the highest possible ability in your sport look for qualified professionals that understand the demands of your sport and how to help you reach your goals. These professionals need to perform an in-depth assessment and let their assessment results dictate the training on top of age and injury history.
If you are looking for trusted professionals in your area please contact me and I will be glad to help you find the best in your area.